BANDAI NAMCO Studios’ next role-playing game is Code Vein. You will encounter the first heir and hear about the queen’s plans at the Shrine of the Sacred Blood region. You will also be able to enter unique doors that will lead you to locations in which other successors are located.
Another of the locations is the ROFS, whose heir was Mia’s brother, Nicola. The outcome of the game will be determined by your actions in this region. This game has three different endings. Below are a few tips and some additional information regarding all mistle & fionn vestige parts location code vein ROFS.
Few Essential Code Vein Tips You Should Know Before You Play
1. You May Perform A Combination Into A Modified Drain Attack.
The attacks in Code Vein are a little clumsy, but you may strengthen your combos by using weapons, craft Gifts, and shortened drain attacks. You must normally deflect, backstab, and charge up to perform a drain attack, but you may perform a quicker variation mid-combo by hitting R1 / R Trigger + X / A after performing a light strike. This motion is easy to ignore, yet it is really useful and fashionable.
2. Finish Your Depths Maps As Soon As You Can For Treasure And vestiges.
Many NPC quests award you with Depth maps that you may exchange with Davis at the hub to access additional alternative dungeons. Such maps can also be found scattered all across the levels. When you obtain a new map of Depths, make sure to clear the matching dungeon as soon as possible. Depths dungeons are brimming with upgrade components, Vestiges, one-of-a-kind weapons, plus Blood Veils, as well as other treasures that will help you out in the main game.
Code Vein Fionn ROFS Vestige Locations
Vestige Part 1
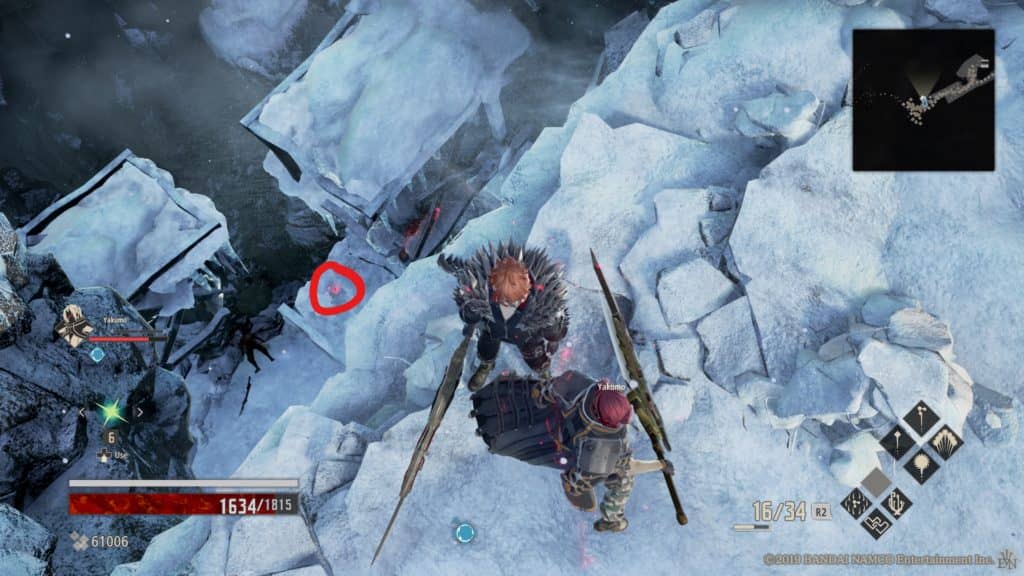
The entire map of the region ROFS may be found in the picture above. To find the remains of part 1 of Fionn, go to the place where you need to jump, as shown in the picture above.
Check out the picture underneath to figure out precisely where you’ll have to leap. After leaping down and also collecting the components, you must go until you reach a ladder. Continue climbing to reach the first mistle spot.
Vestige Part 2
To where you jumped down to discover the vestige part 1, walk straight, next take a right, then keep on going until you reach the edge, in which you will discover the vestige portion 2. The exact position may be found in the picture above.
Vestige Part 3
You’ll discover a route to the right-hand side of the cave from the Iceless Falls mistle. Continue on in the cave until you reach a crossroads with two exits. Do not walk to the right side of the cave; instead, go over to the left side to discover the exit.
After leaving, you will encounter 2-3 losses, defeat them, and locate the Fionn Vestige Part 3. There is also the third mistle that has to be purified.
Vestige Part 4
Continue climbing the ladder after defeating the lost to view a mini cutscene with Nicola. Afterward, you’ll come to an open region with several demolished buildings in front of you. Going towards the wrecked structures will bring you face to face with the same lost who already has claws, but it is a little tougher.
The Fionn Vestige Part 4 may be found on the floor opposite the lost. You have the option of killing the lost or taking the Vestige Part 4 and fleeing for your life.
Code Vein ROFS All Mistle Locations
In Code Vein ROFS , there are 5 locations which are mentioned below.
Location One
Learn how to get the Vestige Part A in order to locate the first mistle.
Location Two
To locate the Iceless Falls mistle, turn left after going straight to discover the Vestige Part B.
Location Three
This mistle may be found in the Fionn Vestige Part 3 location.
Location Four
If you take the route from the left-hand side of “Iceless Falls,” you will come upon a lost claw. Kill him and ascend the ladder to watch a brief cutscene with Nicola, and then after the cutscene, the 4th mistle will appear right behind you.
Location Five
After obtaining the Fionn Vestige Part 4, go from behind the wrecked structure until you reach a fork in the road with two ways. One way will take you to additional demolished structures, while the other will take you to the ice cave.
Go over to the demolished buildings and murder all of the victims. The fifth missile position may be found on your right side.


